Guest Post | Project Life with Kinsey

I met Amy a few weeks ago for the very first time at Camp Calico and having followed her work and her blog for years, I was pretty stoked. I brought my PL stuff and some other work stuff with me to Camp Calico just in case we had a little free time here and there to kill, which we did so I grabbed my album and my notebooks and got to work at the kitchen table. Amy noticed the album and asked if it was my Project Life album and if she could look at it. Of course, I told her yes but to keep in mind that I don’t do it the “right way, I skip around and there are a lot of weeks that I haven’t done yet”…that was a pretty cool moment, watching her look through my hot mess of an album. Then, my heart sank a little when she got to the first unfinished spread, I tried to flip the pages to the next finished one and she was like, “No, let me see that! Are those post-its all over the pockets?! What are those for?!” I was so busted. She saw all the messy parts that no one else is supposed to see. That’s when the questions began and I realized she was actually intrigued by it and wanted me to do a guest post about it… So before I jump right in, let me start with a confession and a disclaimer: I’m a newbie Project Lifer with about 8 months under my belt and this is what I’ve found works for me so far. I’m organized and structured, but also very accustomed to my ‘systems’ evolving or being vetoed completely if it’s not working for me. In the paragraphs that follow, I’ll talk about my way of planning: what I do and why I do it, and then, the creative (FUN) part of bringing it all together. I love reading about how others are making this project work for them and I almost always end up stealing an idea or two and adapting it to fit my approach, I hope I can offer the same to you guys today :)

I’ve thought a lot about why I’ve been able to hang with Project Life and not all the other long-term projects I’ve given up on in the past… for me, Project Life is both a spontaneous, and a structured, chronological way of scrapbooking. It’s all-inclusive and yet compartmentalized in a manageable way. I love that it’s a creative record, timeline, and a more genuine and real look at our family on a fairly daily basis.This project also answers my need for organization while giving me the flexibility of working on it when I get a chance. I’ve figured out how to make Project Life work for me in a way that keeps me going and motivated, and I think that is the most important part to tackling a long term project like this without getting burnt out on it or bringing guilt, failure, or timelines into the equation.


Because of the way my brain works, I knew early on that I would need to figure out some sort of structure that would accommodate my need for order but that would also let me work backwards or out of order whenever I wanted to, without guilt or worry that I would forget something important and, with my Studio Calico Project Life DT schedule, I always need to have several weeks unfinished because we get our kits a few weeks early. This works really well for me because it’s no pressure and gives me options so that I can choose a week to work on that fits the feel or color scheme of a particular kit.One of the most helpful “systems” that I’ve put into use is my weekly journal. I use Pilot FriXion Ball Erasable Gel Pens and the notebook I’m using for this is made by a company called Whitelines. I love that they have white gridlines on white paper and the spiral bound version is my favorite, it opens and lays flat. Highly recommend if you love graph paper like I do :)Each week has its own page and I pre-labeled them with the week number, date range, and the days of the week with enough space for a few lines of brief notes about what went down that day. I usually update it every few days to a week… no set schedule on that.

I also use an 8.5 x 11 inch expandable file folder with several divided sections to hold all the bits of paper from each week. I like this size because most of the papers I end up keeping aren’t any bigger than 8.5 x 11 and I wanted all the weekly bits to stay together in one place until I’m ready to put it to use. I don’t add items to the file as I get them, I usually let things accumulate in my purse and in a basket on the kitchen counter and almost every Wednesday night, while we’re watching our scheduled tv shows, I’ll grab the basket and my purse and sort through everything and put only the keepers in my pocket folder. Again, this isn’t a scheduled thing, but since I like to multi-task during tv time, it has become the most regular part of my Project Life system, ha!Choosing, editing and printing photos is my least favorite part of any scrapbook related undertaking…I hate it. I dread it. It’s no fun, but it’s a necessary evil. When I upload photos from my phone or my camera to my computer, I have it set up so that they go into folders by date taken and then I drag and drop them into a weekly folder with the week number as the title. This just streamlines editing & printing and it also helps fill in gaps in my weekly journal if I’ve forgotten to write something down.

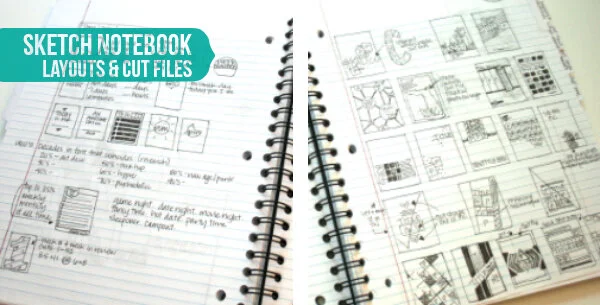
Sidenote: I went ahead and made a folder for each week for the remainder of the year so that I can just drag and drop the folders for that week into the correct weekly file. It took me about 15 minutes to get all the folders made and it’s one less step for me to do when I’m loading the photos, plus, I can reuse them year after year…BONUS!I decided to do a hodge-podge of page protector styles at random so I ended up going with a mix of Project Life style A, B, C, D, F, G, H, I, & J protectors, as well as other page protectors including: 6 x 12, 8.5 x 11, 4 x 6, 6 x 6, baseball card/ 9-slot, coupon sorter, and coin holders/ 20-slot square pocket page protectors to use as insert pages as needed.I don’t have a set time or a scheduled date that I sit down and work on the planning part of my album because I’d just be setting myself up for a fail. Instead, I just do it when the mood strikes. Usually it’s every 2-3 weeks depending on how busy things are…and I know that probably sounds crazy but it works well for me, plus, when I have a few weeks to do at a time, I get into a good groove and that inspires ideas for layouts, quotes/lyrics to use, cut file ideas…yet another reason why I love this project.Sidenote: In addition to my Project Life supplies, I also keep my sketch & idea notebook handy during this time because as I mentioned earlier, that’s when I get some of my best ideas so I jot those down when they hit me so I don’t forget. I use a regular college ruled, 3-subject notebook for this because the larger notebooks last a lot longer for me.

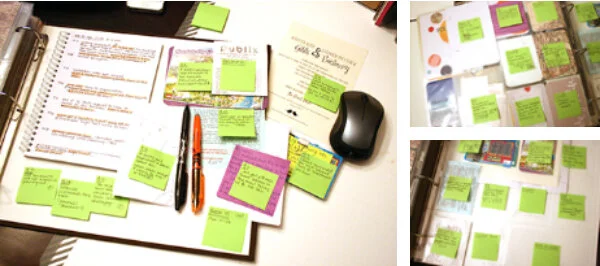
Since I organize everything by week, I start mapping out each spread by skimming over the week in my weekly journal just to jog my memory, I open that week’s photo folder on my computer, and I pull out the week’s bits and pieces. I look over everything and decide what events are definitely going in a pocket and everything else becomes possible filler cards or will be on the week in review card if I have room for one. Here’s where the post-it notes come into play…I jot down a brief note about each item on its own post-it note along with the date, any extra bits of paper or ephemera that go along with it, and if I have a photo of it, I add a ‘P’ with a circle around it. The post-it goes on the front of the pocket, the ephemera goes inside the pocket.
I try to spread the ‘must have’ notes evenly across the spread and then I go back and add post-its for the other events, and lastly, fillers. Sometimes I have ideas in mind for certain cards so I’ll add a sketch or description to remind me.


Once I have the spread all mapped out, I edit, crop, resize, and save all the photos I plan to use to a new folder for quick adjustments and printing when I get around to creating the spread. I always wait to print photos until I’m actually making my cards so I know what colors and patterns I’m working with.Since everything is pretty much already mapped out for me, making the cards is the easiest step. I work on one card at a time, in no particular order and as I finish an insert or card, I put it in its designated pocket as I go so that I can spread certain colors or patterns out as needed. I prefer each card to visually stand on its own since usually each card covers a different memory.I’m a receipt keeper, so I thought it would be neat to incorporate a receipt pocket each week if there’s room for it. The other regular in most of my spreads is the week in review card. Again, I add one in if space permits, or I’ll make room for them sometimes when we’ve had a particularly wild week and I had lots to say about it. It’s just a way for me to include less substantial events in the spread without using up too much real estate.I love making my own filler cards, I use the fillers to break up clusters of photos and/or journaling cards plus, it’s a bonus that they’re an opportunity to just play… I usually end up using techniques on them that I don’t usually employ with photos or journaling cards because I always feel like they end up too busy or overdone. My go-to fillers usually include stamping, heat embossing, sewing, Silhouette cuts, or a mix of these.
My top 3 tips:

1. Don’t work around Project Life, make it work for you. There’s no need for deadlines, rules, timetables, or guilt (unless they truly work for you and motivate you). It’s a fun project to work on, so let it be just that, FUN! Do what you can, when you want, and however you like. 2. If you want to use something bulky, attach it to the outside of the protector, it’ll keep the pages from warping as much, cards will fit better in the pockets, and it adds a little texture and in some cases, a fun interactive element that kiddos will love- every time Brianna looks through our PL album and she comes across a tab sticking out, a wood veneer, a paper clip, a thicker, or a flair button, she runs her fingers over it without even realizing it.
3. Be a main character in your PL album… make a conscious effort and choice to include yourself somehow in each spread whether it’s a photo with you in it, your handwriting, or journaling about something that is personal... Some people are excellent at including themselves on a regular basis in many different ways. I really struggle with the photo aspect of this and need to work harder on that.

So that’s my Project Life strategy in a nutshell. Thanks so much for stopping by and hanging out with me today! It’s been a huge honor :)
WOW - What an amazing post. Thanks so much!! Please leave Kinsey some love in the comments and on: her blog | Studio Calico Creative Team | Instagram